I love the winter holidays. It is true that the weather is a bit gray and gloomy, and the sun rises late and sets early. But it’s the perfect time to dream and sew. And some of my favorite projects are created from thrown-away wool sweaters—you know, the ones with a few tiny moth holes? To prepare for craft projects, I stash the wool sweater into the hottest water my washing machine can produce, and then toss it at the highest heat into my dryer. And then, to get the feel of wool felt, I do it all over again.
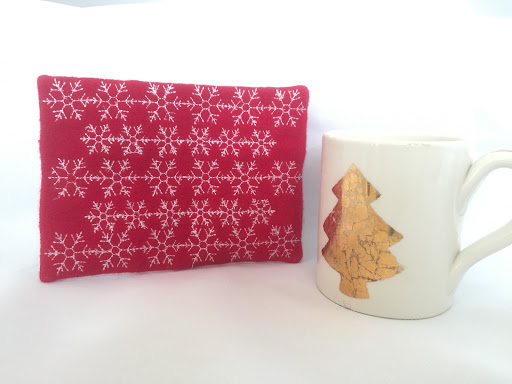
This project is one of my favorites: a mug rug. I find myself searching for one every morning as I drink my tea and read my morning news. It protects my desk and just looks warm and cozy.
I like the look of red and white Swedish embroidery, and while I don’t have a loom, I thought I would try for a similar look on my embroidery machine. I hope you like the results! It’s perfect for a cold winter’s day!
Instructions:
Supplies:
Free download wintermugrug.pes available here
Sweater sleeve from old wool sweater
White embroidery thread
Tear-away stabilizer
Wash-away stabilizer
Embroidery machine with at least a 5×7” hoop
2 14”x18” rectangles of backing fabric
Step 1: Prepare for embroidery
Hoop the tear-away stabilizer
Cut a piece of wool 10×8”
Using a spray adhesive designed for machine embroidery, adhere the 10×8” wool to center of hoop on top of the tear-away stabilizer
Load file
Load hoop into machine
Using the basting function on your embroidery machine, baste the wool to the tear-away stabilizer
Step 2: Embroider design
Choose color 1, outline. This will embroider the outline for your mugrug
Choose color 2, snowflakes. Be patient with this embroidery. I digitized it so that it looks most like hand sewing, so it takes a while to embroider. Be certain to clip threads as necessary.
Step 3: Prepare backing
Fold your backing pieces in half so that your 14”x 18” pieces of fabric turn into 7”x9” pieces
Place so that raw edges are on the outside of the mugrug outline and the folded edges are on the inside of the mugrug outline. This will form an envelope backing for your mugrug
Step 4: Sew Envelope Backing
Sew color 3, the sew down line for the envelope backing.
After sewing, remove from machine, trim edges, wash away your wash-away stabilizer and turn. Voila!
